Friday, December 3, 2010

❤ What Makes You Smile? ❤

Santa Christmas Pine Tree HolidayThis time of year one of my favorite things to do is to dig through my small stash of holiday decorations and wrapping materials in search of treasures. As I unwrap the breakables I am smiling and enjoying each of my little festive figures.

Each one brings back memories of special people and the happy times we spent together over the years. This Santa is ceramic but he looks like carved wood. I imagine he's bringing this pine tree in from the woods.

Here are my other Santa figures plus a cute Santa mug. We had a set of Santa mugs when I was a kid, and when I found a pair at a garage sale a few years ago I was so happy !!

Santa Mug SnowmanBesides Santa figures I also enjoy Snowmen. My siblings and I usually made Snowmen as part of our day of play after a big snowfall. We also sledded and made snow angels. Generally we got very cold and got some exercise, but that's not the part I remember as much.

Snowmen look jolly and happy I think. They wear nifty scarves and hats, and have carrot noses. Here are my little figures, which each year remind me of all the fun snow can be.

I hope all my family and friends are enjoying their own holiday traditions this year and making lots of their own smiles.

Wednesday, November 24, 2010

༺ Knit Bonnet with Ear Flaps ༻

What are you working on this winter? I'm trying to knit my perfect dream hat !! Here is how it is progressing so far...

This is a prototype of the hat I want to create. It has some flaws, but also some great features. Let me explain.

An age-old problem I've always had with hats is that they usually completely flatten my bangs. Any regular beanie hat annoys me that way. Either that, or they don't keep me warm, such as a hood with flappy open sides. I want a hat that can be layered under a hood or bulky scarf, yet can stand alone when it isn't too cold outside.

I found some bandanna hat patterns and bonnet hat ideas. These seemed closer to what I was thinking of, so I decided I'd try building from a basic form and create just what I wanted.


This hat works pretty well. My bangs stay nice, it keeps my ears warm, and there is room in the back for my hair. I even found a nice acrylic yarn that is actually warm and not scratchy.


I do need to fix a few things. The flaps don't lay perfectly yet, and when putting it on there is a moment of confusion as to which side is the front and which is the back. These challenges are being worked out in my next attempt to knit the perfect dream hat !!

Someday when I've created a good model I'll list these hats in my etsy shop. Hopefully someone else out there is looking for a knitted aviator ear flap hat too !!

Thursday, November 11, 2010

☂ Beanie Hat ☂

What to do with extra sock yarn? I'm trying a few projects, including using the yarn to knit a beanie hat. This one is knit on a size 2, 20" circular needle. I think I might try an even smaller needle next time to create a tighter weave. Knitting involves a lot of trial and error !

The pattern I'm using starts at the brim. I cast on 128 stitches, then joined in the round. After a rib pattern of K2, P2 for 5 inches, I changed to K4, P2. I'll continue this way for a total of 12 inches. Then I'll start the decreases for the crown.


I think next time I'll do a few rounds of Purl periodically to add more interest and to smooth out where the ribbing pattern changes. Every project just feeds ideas for the next, or so it seems !!

Wednesday, November 3, 2010

♪ I'm Expanding ♪

Nope, not in the weight department. Been there, done that !

What I do mean is that my etsy shop will soon feature more types of items. Previously my focus was only on crocheted flower products. I had patterns, plus finished flowers, bouquets, arrangements, appliques, etc. As my readers have seen, over the past year I have begun dabbling with knitting and soap making. So I decided my shop should start including more items from these new craft interests.

My shop name used to be "Crochet Bouquet'. To better reflect my product expansion I have changed it to "Fiber & Suds". Just to be clear, the suds part refers to soap, not home brewed beer ! Who knows though, that might be in my future.

It will take time to add knit and soap items to the shop however. Knitting takes a great deal more time than making crocheted flowers. I haven't decided what to post exactly, but it will come to me. The soap will be of the goat's milk variety, both scented and unscented. Soap has to age before it ships, so these products will also take time to establish.

So stay tuned and thanks for keeping up with all the crafty activity coming from our Colorado farm !

Wednesday, October 27, 2010

❤ Goat's Milk Soap ❤

Making soap is like most things, it requires the right tools and lots of upfront preparation. This week I made my very first batch of soap, and it actually worked !! Here are some of the highlights.

The first task I undertook was to research how to make milk soap. The library and on-line resources gave me lots of tips. Next I went to a few local thrift stores and loaded up on the necessary supplies. I filled two big plastic tubs with stuff, from stainless steel pots, to spatula's, measuring cups, ice cube trays, towels, a thermometer, and soap molds.

LOL, my patio vegetables are still making fruit inside. Check out the flowers on the tomato plant.

My recipe was very basic: Olive Oil, Coconut Oil, Goat's Milk, and Lye. I made half just like that, then tried to get fancy with the other half of the batch. To that I added Clove Scent, Poppy Seeds, and Cinnamon. Here are the two batches in their molds.

I tried a few experiments with the second half, such as putting Cinnamon or Poppy Seeds at the bottom of the molds, and stirring Cinnamon into the soap once it was poured.

After 24 hrs in the molds, I froze them for an hour which made it pretty easy to pop the soap out. Next I needed to cut the large block, and use a vegetable peeler to soften the edges. Don't the muffin ones look cute, like little cinnamon tarts?

Finally, the soap needs to cure. Over the next few weeks I'll rotate the bars and watch as they get harder and better. Before long the Goat's Milk Soap will be ready to use. This was a fun experience !!

༻ Fall Colors ༺

Fall has lasted a very long time this year, so a number of flowers are still tempting my camera. Here are a few shots from around the yard this week.


I'm not going to complain - another day with flowers is certainly a good day.

Be watching for my next posting. I have begun a new adventure: making homemade goat's milk soap !! The first batch is curing on the table beside me and in a few minutes I'll remove them from their molds and take a few pictures. Details next time !

Wednesday, October 13, 2010

✈ Enjoy While You Can ✈

As the warm days start to slip away, I've been trying to appreciate my flowers everyday. There aren't many left, but luckily the gaillardias are still blooming. Today I got a treat when a lovely monarch butterfly came by to help me enjoy the blooms:


The honeybees were also busy on the flowers:


I'm not ready for snow !!

Thursday, October 7, 2010

༻ String It Up ༺


The garden produced a lot of peppers this season, so I strung them up into Ristras. First I pulled up the plants and hung them upside down in the garage for a few weeks, then indoors for another few weeks. Finally I cut them off the plants and used a needle and thread to create long lines of peppers.


I put about 5-6 dried red peppers per string, then tied a few pepper strings together into one long group. These will be pretty to look at and make handy pepper dispensers when we need them for cooking. In addition, some peppers were frozen earlier in the season, and maybe we'll chop up some of the dried ones later to make a pepper spice. Hopefully they will last through the winter and help us create some delicious meals.

Wednesday, September 29, 2010

♪ Don't Cry About It ♪

Ever find yourself weeping while cutting up onions?

Here is a quick post to share a few simple, yet effective onion chopping tips. As I started another batch of salsa this week it occurred to me that maybe I should do some research to better prevent my garden onions from making my eyes water so much. What I found was very helpful, so I thought I'd share:

- As I cleaned the outer skins and greens from the onions I did the work in the sink with cold water running on them.

- It was recommended that the onions be cold, so I popped them in the refrigerator before I chopped them.

- For the actual chopping, I lit up my favorite scented candle right behind the cutting board. Since the onion creates a gas when cut, I read that a candle would burn the gas before it gets the chance to irritate eyes.

- I used a sharp knife, which helps reduce the creation of onion gas.

Using these techniques made a dramatic difference ! I recommend these tips !! If you have other methods, please share them in the comments.

Thursday, September 16, 2010

♪ Best Friend ♪

This garden season, I made a new best friend !


I can't tell you how many times I've referenced this great book as I learned about putting garden produce by. I canned salsa recently, and before that made pickles and plum jam.

The plum jam was fun to do. After visiting a garage sale we found out they had a plum tree full of ripe fruit for the taking. As is usual, the picking, cleaning and cutting was the hardest part of this process. But in the end, we froze even more fruit than we were able to turn into jam. Maybe in the depths of winter we'll make a few more jars of jam.

Here are a few more pictures of the plum jam project. I just used the plums and some sugar . Here are the exact numbers: 5 cups of chopped plums, 3 cups of sugar, and 3/4 cups of water. I cooked this mixture for about 1.5 hrs until it seemed 'gelled'. Then I poured it into the jars, and processed them in a boiling water bath for 25 minutes (I live at high altitude). Pretty easy !


Hope everyone's summer is going well too !

Wednesday, September 1, 2010

༺ Garden in September ༻

Today's harvest looks like a little salad !

garden okra tomatoThe cute little yellow fruits are actually tomatoes ! They are shaped like little light bulbs. The pods are black-eyed peas. Here is a cute sight - a cucumber with a little flower on the end:

My latest challenge is to to figure out what to do with the eggplants I'll soon have. I counted today and I have 10 healthy plants, just starting to make eggplants. If you have some ideas, please leave me comments !


This picture shows pole beans, iris, tomatoes, cauliflower, eggplant and onions. It has been a good year in the garden. The grasshoppers would probably agree !!

Sunday, August 29, 2010

Now Back To Crocheting ...

Seems like my posts have been about everything else but crocheting lately ! I guess that's because my life has been busy with other things this summer. But with the cooler weather trying to make a comeback here in Colorado (at night anyway), my mind is starting to move back towards my love of yarn.

One of my favorite guilty pleasures is to turn my little flowers into crochet patterns. It is exciting because I think about how other crafters will adapt the ideas into their own creations. With new yarns, or an added accent button, I imagine that my patterns will help someone crochet a flower unique and special to them.

The latest patterns to join my others include directions for the Pansy, a Daffodil, and the Frilly Daisy. Here is a group picture of these new flowers:


I think these flowers will make a nice addition to my other patterns. To see all the patterns I have available, come over to my etsy shop soon.

Thursday, August 26, 2010

✈ Cucumbers, So Many ✈

I'm swimming in cucumbers from the garden, and I only have two plants ! I eat a salad most days, and still find I have to manage the cucumber supply. Here's a recipe I've been using to make 'pickles', that I keep in the refrigerator instead of canning.

cucumber
Start by gathering some jars with lids. Slice the cucumbers any way you like and put them in the jars. I fill them full, and notice that in about a week they have shrunk up. Next, combine these ingredients in a saucepan and heat until about boiling. I use this amount of liquid for 2 pint jars.

~ 2 1/2 Cups White Vinegar
~ 2 Cups Sugar
~ 2 TBs non-ionized Salt
~ 1 TBs Celery Seed Spice
~ 1 TBs Mustard Seed Spice
~ Dash Dill Spice

Once hot, carefully spoon the liquid into the jars until the cucumbers are covered. Allow the jars to cool, then put on lids and place the jars in the refrigerator.


As the jars cool down further, the liquid will thicken up. I gently turn the jars upside down and back a few times over a few days. This causes the spices to mix and stay further down in the jars over time.

After a few days, the refrigerator 'pickles' are ready to eat. I use them sparingly because of the sugar, but a few on a garden burger or in a salad add a really nice taste.

Wednesday, August 18, 2010

♪ Garden Notes ♪

Gardening season is racing ahead and I can barely keep up ! What a strange year this has been for us in Colorado. Wet. We aren't used to that ! Today we even got a new batch of mosquitoes. They kept me swatting as I dug up some new potatoes, which made for a nice potato salad.

I got cheesecloth put on the sunflowers to see if that helps keep birds away from the seeds. I tried a t-shirt first, but that was pretty heavy and made the flower droop.

Here is my first ever batch of fried okra & hot peppers ! DH said it was good:

Here is the raw okra, along with some black-eyed-peas (which I discovered were not quite ready):

The corn is in too. I froze about 3 dozen ears last weekend. I also made some refrigerator pickles from cucumbers, since I can't keep up with eating the fresh ones:

And of course the beets are still coming in:
I have frozen some hot peppers too. The remaining peppers will be used to make salsa, once our onions and tomatoes are ready. I'm planning to can the salsa in jars, so stay tuned for my posting about that adventure !

༻ Snake Relocated ༺

At our farm we separate local prairie snakes into two categories: friendly and not-friendly. Bull snakes are the type we like to see. They are fairly docile, eat mice, and some say keep the other type, rattle snakes, away. Here is a bull snake looking for mice around the house:

bull snakeThis week, sadly, I inadvertently relocated one of the farm's bull snakes into town.

Since my car is parked outside, I do get rabbits and mice in the engine occasionally. Well, a bull snake must have been looking around in there for a meal when I decided to go to town. I made a few stops, running errands and leaving the car in different spots, as my day progressed. Here is a picture that shows the stripped tail, a sure sign that this snake is not a rattler:

Around mid-day I was enjoying lunch, with the car windows open, at a local grocery store's parking lot. An attendant walked near me to get grocery carts. Suddenly, he started pointing to my car tire and said, "Look, there is a garter snake!"

I looked out my side window and saw the familiar grey and black stripes of a snake. It looked pretty big ! I hopped out and came around to take a look. Sure enough, it was a bull snake ! I could only imagine that he had dropped out from under my car.

A few people gathered and someone got a tree branch to see if they could pick the snake up to relocate it to a nearby field. But the snake wasn't interested in that, so it slithered to the car parked behind me, and zip, fast as could be, it went up inside a Ford Mustang. The owner was one of the people standing around, so at least he knew what was happening !!

The snake didn't come out, and since the man with the Mustang started a conversation with another person, I went on my way. Hopefully he drove to a park and sat for awhile until the bull snake found a suitable new home.

Thursday, August 12, 2010

♪ Granola Recipe Favorite ♪

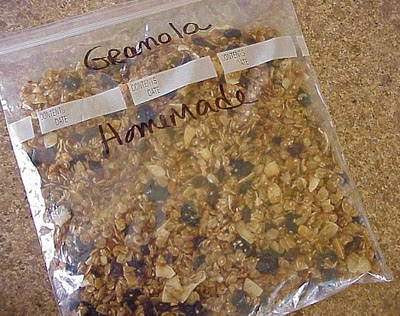
Recently, after tiring of buying granola so often, I decided to try my hand at making it at home. I searched around on blogs for recipes and opinions, finally finding several recipes that sounded tasty. The whole process turned out to be pretty easy, so I thought I'd share my experience here. This recipe makes enough granola to fill two large freezer bags like this:


First let me say that I'm not a real kitchen person. I know the basics, but even at that, I sometimes mess up simple things. So I needed a recipe that wasn't too complicated or challenging.

Here is what I use (it is a blend of a few recipes I found):

- Liquid Mix Ingredients: 2/3 cup Honey, 1/2 cup Vegetable Oil, 1/3 cup Brown Sugar, 2 tsp each Vanilla and Almond Extract
- Dry Mix Ingredients: 1/2 cup Almonds (whole), 1 cup Coconut Flakes, 1/2 cup Sesame Seeds, 1/2 Cup Sunflower Seeds, 5 Cups Old-Fashioned Rolled Oats
- 2 Cups Raisins or other dried Fruits
- Cooking Spray for baking sheets

Let me tell you upfront that making granola takes an hour or two in the kitchen, plus utilization of a few bowls, pans, measuring cups/spoons and spatulas. The time starts when you start digging out everything you need, continues during preparation, cooking, cooling, and then finally there is a bit of cleanup. So don't plan to try this process if you only have a half hour to spare.

I use one very large bowl, two metal baking sheets, a manual nut chopper, and a small sauce pan. Plan on having the counter space to lay the baking sheets out on, since there is stirring to be done during and after the cooking steps. The oven needs to have two racks that are arranged pretty low in the oven. I have found that the lower rack browns the granola better.

Pre-heat the oven to 300 degrees, then:
1) Combine the Dry Ingredients in the very large bowl, mix well. Chop Almonds as part of this step
2) Combine the Liquid Ingredients in the small sauce pan - all except the Vanilla and Almond Extract for now
3) Heat the Liquid Ingredients til it is all combined, then remove from heat, and stir in the Vanilla and Almond Extract
4) Pour the Liquid over the Dry Ingredients, mix well. I use two large spatulas to turn and mix
5) Spray the baking sheets, then dish on the mixture, smoothing it out to cover all the surfaces
6) Bake for 30 minutes, with these activities mixed in:
a) stir after 10 minutes
b) remove after 10 more minutes (total 20 minutes) to add the raisins
c) remove after 10 more minutes (total 3o minutes) and start the cooling process
7) Allow the granola to slowly cool down. Stir every 5-10 minutes to prevent clumping
8) Optional - I like to put the granola back in the large bowl to finish cooling, since it is easier to stir it there
9) Once cool, put the granola in your favorite container
10) I refrigerate 1/2 of it for immediate use, and put the other half in the freezer

As I mentioned earlier, my lower baking sheet tends to brown the granola better. That's probably why I mix the batches back together to even out the colors. Regardless, this recipe has worked well for my family and it has become a frequent activity at our house.

Do you have a good granola recipe? Please share in the comments section so that I can continue to improve.

Saturday, August 7, 2010

❤ Sunflowers Open ❤

As promised earlier, I got my sunflower pictures fixed up. Now I can show a series of pictures that illustrate how my 10 foot sunflower plants look as they bloomed this year. Their sheer size is so amazing, then on top of that grandness, big lovely flowers pop open over a course of a few days. Here is my series, I hope you enjoy it as much as I did watching these beauties:


Continued vigilance will be needed if I'm going to get the seeds before anyone else. Hopefully I'll do a post in the future about that process. If the birds get them, at least I know the seeds will be going to a good cause though.

♪ Garden Goodies ♪

My sink was full this morning - check out the day's harvest !!

garden vegetable pepper kohlrabi turnip
The turnips (I had about 8 more like that one) got frozen, as did the hot peppers. The kohlrabi was used in a stir-fry for dinner. Tip: did you know that if you get hot pepper oil in a cut or in your eye, that washing it with milk relieves the pain? Even soy milk works.

A few days ago I made some refrigerator pickled beets. I found out that you shouldn't replace the sugar with Splenda. That batch came out too acidic and I had to compost it. The other jars were made with sugar, and those are delicious !

mason jars canningSuch a pretty color ! beets jar
All the efforts in the garden are paying off this year. Despite some busy Colorado potato beetles, the produce is turning out nicely. Next I need to get ready for the corn !!

Wednesday, August 4, 2010

༺ Garden Pictures ༻

We enjoyed our first tomato of the season this week. I grew this one in a pot on the patio, so it stayed a little warmer I think. It was sweet and delicious ! The ones in the garden are still green, but look out, when they are ready I'll have to be doing some serious kitchen time.

tomato
I also have some nice interesting plants in the garden this year, including okra, eggplants, musk melons, and this cutie - a kohlrabi ->

garden kohlrabi
I should probably pick this one and try it in a salad soon.

The Colorado potato beetles have moved from the potatoes to the eggplants. What a damaging little bug these guys are ! I have to be diligent with picking them off every day, or else the plants would be stripped.

The sunflowers are getting really big, and the bees are really enjoying them. I need to work on my pictures, but soon I'll write a post showing the stages of the sunflowers as they open up. I found this fascinating to watch.